The Job Service Deployment repository can be used to deploy the Job Service. This repository provides the necessary deployment files in Docker Compose v3 format to launch the Job Service as well as a set of additional services included to provide a simple but complete demonstration of the Job Service.
The list of additional services include:
The only pre-requisite required to getting started with the files provided in the Job Service Deployment repository is that Docker must be available on the system.
The Job Service also ships with a Swagger-generated user-interface which is provided on the same host and port as the web service. It is accessible from the /job-service-ui endpoint on the Job Service:
http://docker-host:9411/job-service-ui
Adjust ‘docker-host’ to be the name of your own Docker Host and adjust the port if you are not using the default.
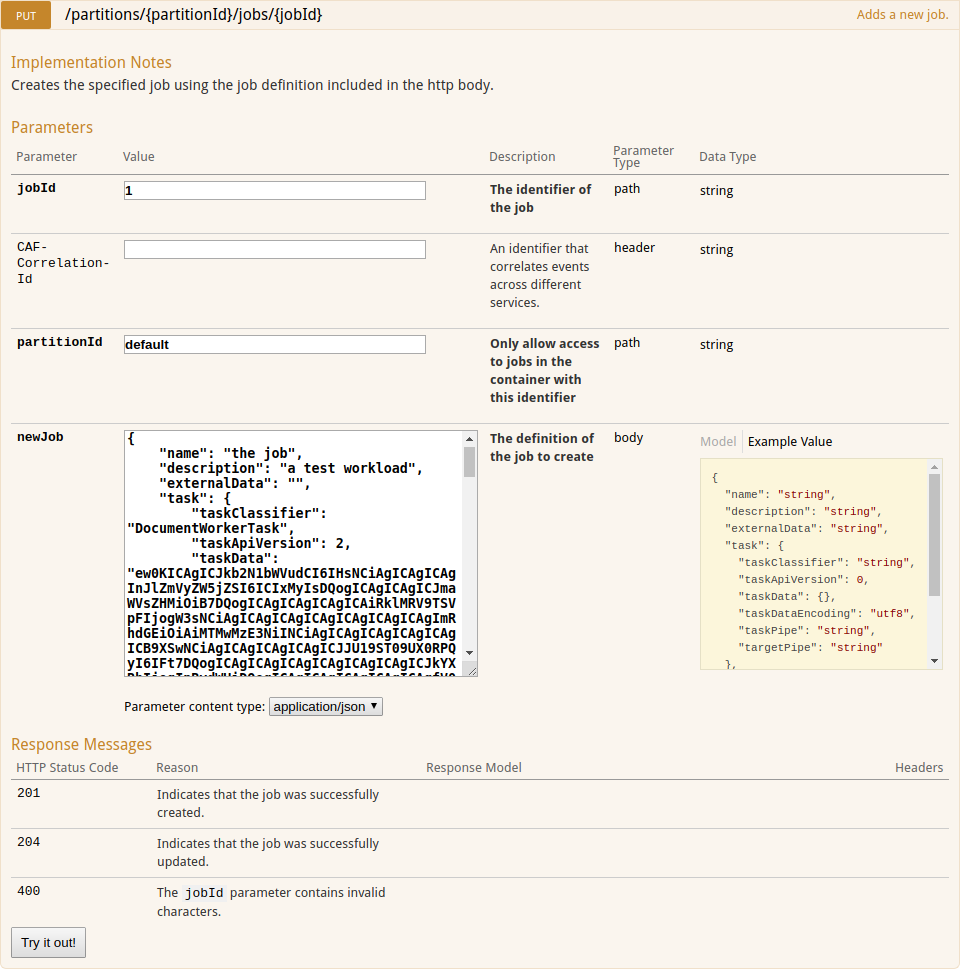
partitionId.jobId.newJob body.Edit these fields with your own details:
name: name of the job. description: description of the job. externalData: Deprecated in 3.2.0, replaced by labels - external data (i.e. information that you want associated with the job but that has no effect on it). taskClassifier: specifies the type of message being sent. Worker feeding off taskPipe queue should be able to process this message. taskApiVersion: API version of the task. taskData: data of the task to be sent. This can be presented in a string format or in a more readable and friendly object format. taskDataEncoding: encoding of the taskData field value e.g. utf8. Only required if taskData field is specified in string format. taskPipe: name of the RabbitMQ queue feeding messages to the first worker. targetPipe: name of the final worker’s RabbitMQ output queue where tracking will stop. labels: A map of meta data associated with this job. Note that the keys can only include alphanumeric, ‘_’, ‘-‘ and ‘:’ characters Try it out!. The resulting code will show whether the addition of the job succeeds or not.
Sample this:
In the example job definition used above, task data is sent to the GlobFilter Worker which is a Batch Worker. This takes in a glob filter as the batch definition, filters a given directory for matches and creates items of work from those matches. These items are then forwarded to the Language Detection Worker which will extract the file content from the work item and identify languages in it’s text data.
Given this example sends task data to a Batch Worker, the following fields are expected as part of taskData:
batchDefinition: definition of the batch or in this case the glob filter to match (i.e. *.txt). batchType: plugin that is to be used to interpret the batchDefinition field. Currently the only supported batch type is GlobPattern. Other batch types may be added in the future as required. taskMessageType: identifies the type of messages to be produced by the GlobFilter Worker. This must be set to “DocumentMessage” (different types may become configurable in the future). taskMessageParams: contains extra information that is required to produce the target messages for the final worker. In this case, each new work item will comprise fields, CONTENT and FILE_NAME, specifying the content reference and file name respectively. In addition, a custom field named outputSubFolder with the value ‘subDir’ will also be added. targetPipe: name of the final worker’s input queue where the Batch Worker is to send the target messages produced. In this case, the target messages will be forwarded to the Language Detection Worker’s languageidentification-in queue. TaskClassifier must be set to BatchWorker as you are sending the job to the GlobFilter Worker which is a Batch Worker.taskApiVersion to 1.taskPipe to the queue consumed by the first worker to which you want to send the work, in this case, the GlobFilter Worker globfilter-in.targetPipe to the name of the final worker where tracking will stop, in this case, languageidentification-out.The message output to the Language Detection Worker output queue, languageidentification-out, can be inspected to verify the job service deployment setup and job success. The payload for the messages sent to RabbitMQ will look similar to the following:
{
	"version": 3,
	"taskId": "1.1",
	"taskClassifier": "DocumentWorker",
	"taskApiVersion": 1,
	"taskData": "eyJmaWVsZENoYW5nZXMiOnsiRGV0ZWN0ZWRMYW5ndWFnZTJfQ29uZmlkZW5jZVBlcmNlbnRhZ2UiOnsiYWN0aW9uIjoicmVwbGFjZSIsInZhbHVlcyI6W3siZGF0YSI6IjAifV19LCJEZXRlY3RlZExhbmd1YWdlMV9OYW1lIjp7ImFjdGlvbiI6InJlcGxhY2UiLCJ2YWx1ZXMiOlt7ImRhdGEiOiJDaGluZXNlIn1dfSwiRGV0ZWN0ZWRMYW5ndWFnZTJfTmFtZSI6eyJhY3Rpb24iOiJyZXBsYWNlIiwidmFsdWVzIjpbeyJkYXRhIjoiVW5rbm93biJ9XX0sIkRldGVjdGVkTGFuZ3VhZ2UzX0NvZGUiOnsiYWN0aW9uIjoicmVwbGFjZSIsInZhbHVlcyI6W3siZGF0YSI6InVuIn1dfSwiRGV0ZWN0ZWRMYW5ndWFnZTJfQ29kZSI6eyJhY3Rpb24iOiJyZXBsYWNlIiwidmFsdWVzIjpbeyJkYXRhIjoidW4ifV19LCJEZXRlY3RlZExhbmd1YWdlMV9Db2RlIjp7ImFjdGlvbiI6InJlcGxhY2UiLCJ2YWx1ZXMiOlt7ImRhdGEiOiJ6aCJ9XX0sIkRldGVjdGVkTGFuZ3VhZ2UxX0NvbmZpZGVuY2VQZXJjZW50YWdlIjp7ImFjdGlvbiI6InJlcGxhY2UiLCJ2YWx1ZXMiOlt7ImRhdGEiOiI5OSJ9XX0sIkRldGVjdGVkTGFuZ3VhZ2UzX05hbWUiOnsiYWN0aW9uIjoicmVwbGFjZSIsInZhbHVlcyI6W3siZGF0YSI6IlVua25vd24ifV19LCJEZXRlY3RlZExhbmd1YWdlM19Db25maWRlbmNlUGVyY2VudGFnZSI6eyJhY3Rpb24iOiJyZXBsYWNlIiwidmFsdWVzIjpbeyJkYXRhIjoiMCJ9XX0sIkRldGVjdGVkTGFuZ3VhZ2VzX1N0YXR1cyI6eyJhY3Rpb24iOiJyZXBsYWNlIiwidmFsdWVzIjpbeyJkYXRhIjoiQ09NUExFVEVEIn1dfSwiRGV0ZWN0ZWRMYW5ndWFnZXNfUmVsaWFibGVSZXN1bHQiOnsiYWN0aW9uIjoicmVwbGFjZSIsInZhbHVlcyI6W3siZGF0YSI6InRydWUifV19fX0=",
	"taskStatus": "RESULT_SUCCESS",
	"context": {},
	"to": "languageidentification-out",
	"tracking": null,
	"sourceInfo": {
		"name": "worker-languagedetection",
		"version": "2.5.0-85"
	}
}
Notice how tracking is null as the message output contains no tracking information. The decoded taskData content should comprise a set of detected language names and codes.
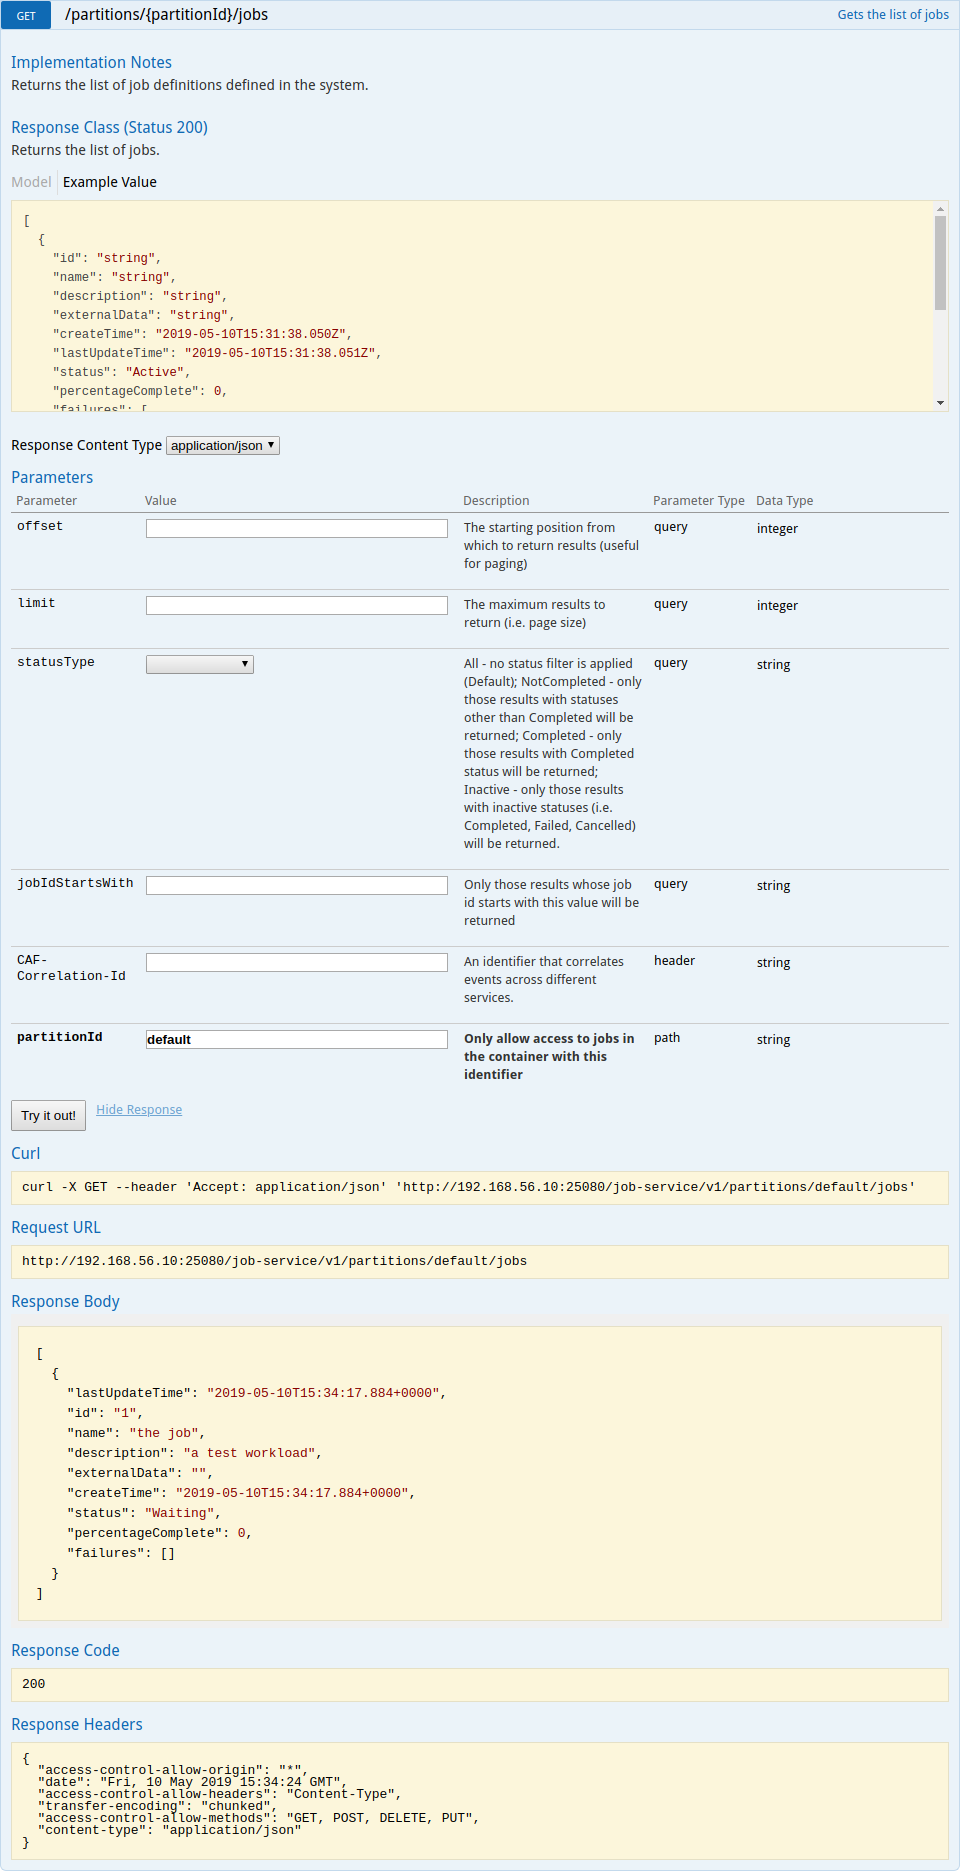
partitionId.Press Try it out!. The list of jobs in the partition appears in the response body, including the job you just created.