Chronos, a distributed job scheduler, can be used to schedule jobs with the CAF Job Service and to monitor them through to completion.
Chronos is a framework for Apache Mesos that was originally developed as a replacement for cron. It is a fully-featured, distributed, and fault-tolerant job scheduler. It includes a REST API that allows for scripting of scheduled jobs and a Web UI for ease of use.
At the heart of Chronos job scheduling is a JSON POST request. The JSON hash you send to Chronos will include a job name, the command to be executed by Chronos and the scheduling for the job in ISO 8601 format. Chronos also supports the configuration of scheduled Docker jobs which can run in Docker containers.
A Docker image is available which can be used to makes REST calls to the CAF Job Service API in order to create new jobs and wait on their completion. The latest image can be downloaded from Artifactory, for example:
docker pull jobservice/job-service-caller:2.0.0
This Docker container has been configured to run as an executable and hosts a script, createJob.py, which calls the CAF Job Service API. The script supports the following arguments:
This section describes how Chronos can be used to schedule jobs within an end-to-end Job Service system. It assumes you have a microservices environment running Mesos, Marathon, Chronos and Docker. The expected end-to-end Job Service system should comprise the Job Tracking Worker, Batch Worker and Example Worker. The sample job definition used in this Getting Started section will send a message initially to the Batch Worker. This worker will then split the batch into individual items and forward each item on to the Example Worker.
In your microservices environment running Mesos, Marathon, Chronos and Docker, ensure the Chronos service is started. Run the following to check if Chronos is already started:
sudo service chronos status
If Chronos is not started, run:
sudo service chronos start
Chronos provides a Web UI which is available via port 4400. This can be used to prove that Chronos is running:
http://<microservices-environment>:4400
You should deploy an end-to-end Job Service system comprising the Job Service, Job Tracking Worker, Batch Worker and Example Worker. See the Job Service’s Getting Started guide for deployment instructions.
Download the latest Docker image for the Job Service Caller from Artifactory, for example:
docker pull jobservice/job-service-caller:2.0.0
In order to add a new job using the Job Service, you should create a JSON file, e.g. MyJobDefinition.json, comprising a sample job definition:
{
    "name": "MyScheduledJob",
    "description": "Description for my end-to-end scheduled job.",
    "task": {
        "taskClassifier": "BatchWorker",
        "taskApiVersion": 1,
        "taskData": "{\"batchDefinition\":\"[\\\"b591d8c6615c4af99d7915719b01259c/3a44156891e645c6828cfe47667f159f\\\"]\",\"batchType\":\"AssetIdBatchPlugin\",\"taskMessageType\":\"ExampleWorkerTaskBuilder\",\"taskMessageParams\":{\"datastorePartialReference\":\"b591d8c6615c4af99d7915719b01259c\",\"action\":\"REVERSE\"},\"targetPipe\":\"dataprocessing-example-in\"}",
        "taskDataEncoding": "utf8",
        "taskPipe": "dataprocessing-batch-in",
        "targetPipe": "dataprocessing-example-out"
    }
}
where:
BatchWorker as you are sending the job to the batch worker.dataprocessing-batch-in. The batch can then be broken down into task items.dataprocessing-example-out.Next, add a Docker job using the Chronos REST API to run on the Job Service Caller container.
A job hash needs to be created to specify the job details including the name, the command to execute and the name of the Docker container to run on. A sample JSON hash is provided next:
{
    "schedule": "R2/2016-12-05T07:58:22Z/PT1M",
    "name": "my-docker-job",
    "container": {
        "type": "DOCKER",
        "image": "jobservice/job-service-caller:2.0.0",
        "forcePullImage": true,
        "network": "BRIDGE"
    },
    "cpus": "0.01",
    "mem": "64",
    "uris": ["/vagrant/testing-package/MyJobDefinition.json"],
    "command": "python2 createJob.py -j BatchWorker:$mesos_task_id -u http://192.168.56.10:9410 -f $MESOS_SANDBOX/MyJobDefinition.json"
}
where:
createJob.py script will be executed with a set of arguments specifying the job identifier, Job Web Service URL and the job definition JSON. The job identifier is derived from a prefix (i.e. BatchWorker:) and the task id auto-generated by Chronos. With the job definition JSON specified in the uris section of the Docker job hash, Docker is then able to automatically pick the file up using the special environment variable, $MESOS_SANDBOX, that the Mesos Docker executor provides to the running task.Once you’ve generated the job hash, send it to Chronos like so:
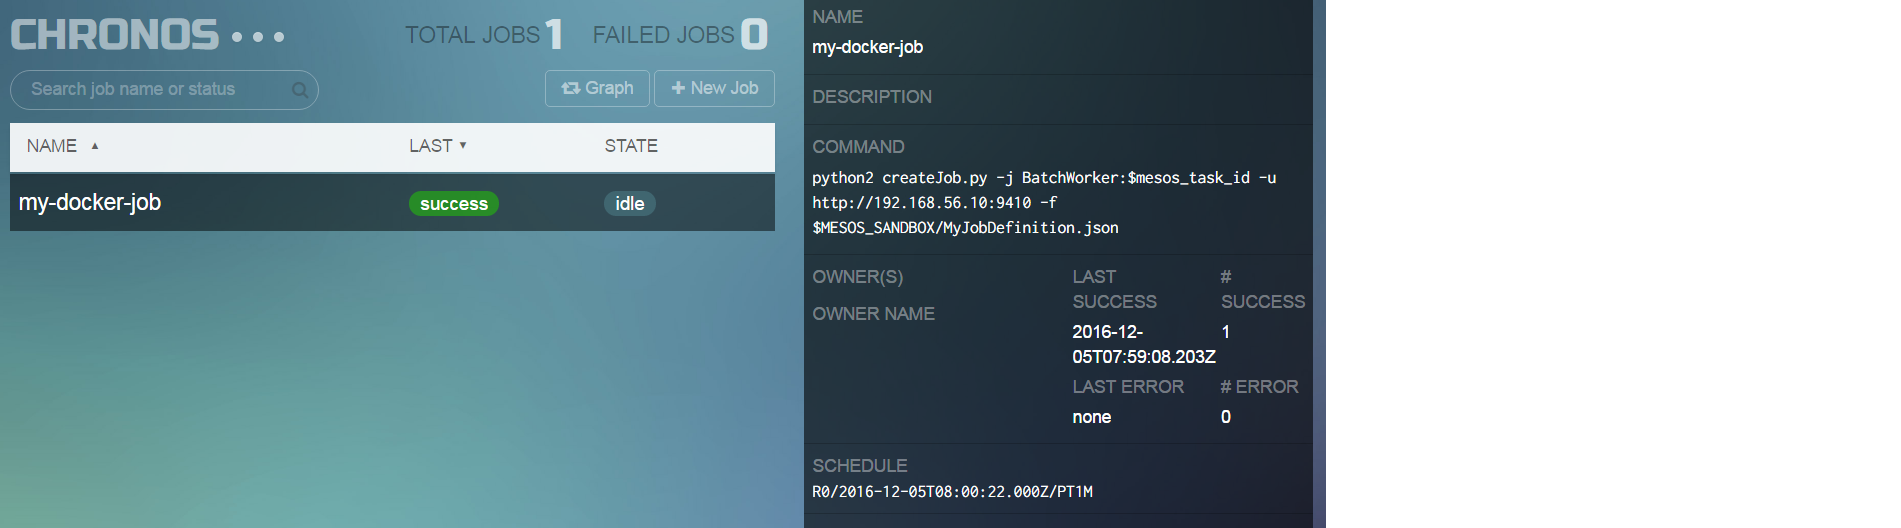
curl -L -H 'Content-Type: application/json' -X POST -d '{job hash}' "http://<microservices-environment>:4400/scheduler/iso8601"After you have sent the job hash to Chronos using the example REST API call above, you can verify that a scheduled job has been created successfully using the Web UI.
The Chronos Web UI can be used to track the status (i.e. SUCCESS or FAILURE) of the scheduled Docker job. This includes date and time information for the last completed and/or failed run. The Web UI also displays the number of successful and failed job runs to date.
Additional logging from the createJob.py script will be available in the sandbox standard output log for the completed Chronos task. See under the Completed Tasks section of the Chronos Framework in the Mesos UI.
The Job Service’s Getting Started guide provides additional verification instructions for the expected end-to-end set up if the Chronos Docker job has completed successfully.